Old Course

Course Overview

It has been described as ‘The St Andrews of Ireland’ and many other complimentary titles.

Those who know and love the place firmly believe that Lahinch Golf Club doesn’t need comparison with any of the game’s other world class venues. From the infant days back in 1892 up to today, the Club has stood out on its own merits as a golfing institution like none other.

Lahinch Golf Club is renowned for the way the links has retained all of its old virtues. It has benefited from the willingness, over the decades, to move with the times and is now regarded as one of the best and most enjoyable challenges to be found anywhere in the golfing world. The legendary Old Tom Morris set the highest standards for the course from the outset. He was followed by equally celebrated architects Charles ‘Mo’ Gibson and Dr Alister MacKenzie. In more recent times, the expertise of Dr Martin Hawtree ensures its place in the higher echelons of all golf rankings.

Lahinch is a key destination on the Wild Atlantic Way, on the edge of the Burren National Park (UNESCO recognised Global and European Geopark) and only 10km from one of the world’s great natural wonders, the Cliffs of Moher.

Course Architects

Lahinch has worked with some of the games outstanding designers from its inception through to modern times; Old Tom Morris, Dr. Alister MacKenzie and Dr. Martin Hawtree.

All the Lahinch architects were initially struck by the awesome links land put at their disposal and to their credit, each and every one took full advantage to create a succession of golf holes of the highest quality.

The course continues with gem after gem running in ever changing directions through awesome dunes and valleys, humps and hollows.

Read More >

Course Guide

Hole 1 : MacKenzie : Par 4
A tee shot to the right side of the fairway opens up the green for the approach shot. The second shot plays uphill so an extra half a club will be required. The green complex slopes from the back left to front right. Avoid the bunkers short right at all cost!

Yardage: 381 Handicap: 8

Yardage: 373 Handicap: 8

Yardage: 363 Handicap: 8

Yardage: 344 Handicap: 3

Hole Flyover
Hole 2 : Village : Par 5
The ideal tee shot is a slight draw off the bunkers on the right side of the fairway. The second shot, if going for the green in two, should be aimed at the left half of the green to avoid bunker trouble. If playing as a three-shot hole, the second shot should be played at the left side of the fairway to open up the green.

Yardage: 534 Handicap: 14

Yardage: 523 Handicap: 14

Yardage: 510 Handicap: 14

Yardage: 484 Handicap: 7

Hole Flyover
Hole 3 : Cillstifiann: Par 4/5
To put the ball in prime position, the tee shot should be aimed 10 yards to the right of the hill guarding the entrance to the fairway on the left. Club selection is imperative from the tee with the fairway running out at 267 yards from the white tee and 222 yards from the Red tee. The approach shot should be aimed for the front right portion of the green, as missing short left or long of the green will leave an extremely tough up and down.

Yardage: 446 Handicap: 4

Yardage: 418 Handicap: 4

Yardage: 401 Handicap: 4

Yardage: 374 Handicap: 11

Hole Flyover
Hole 4 : Klondyke : Par 5
The tee shot on the famous Klondyke, should be aimed at the right half of the fairway to allow the natural contouring to bring the ball back to the centre. For the approach shot, aim for the “V” in the Klondyke Hill and take a club less to allow for the fairway sloping towards the green.

Yardage: 475 Handicap: 9

Yardage: 472 Handicap: 9

Yardage: 463 Handicap: 9

Yardage: 423 Handicap: 18

Hole Flyover
Hole 5 : Dell : Par 3
The famous Dell requires a precise tee shot to clear the dune guarding the front of the green. Aim for the white stone on the hill which will mark the pin position on the day and trust your distance!

Yardage: 154 Handicap: 16

Yardage: 148 Handicap: 16

Yardage: 143 Handicap: 16

Yardage: 118 Handicap: 15

Hole Flyover
Hole 6 : Paradise : Par 4
A shot to the right side of the fairway, will give the best angle for the difficult approach shot to the well-guarded green. The run out at 270 yards from the white tee and 189 yards from the Red tee must be taken into account with your club selection from the tee. The ideal second shot would favour the left half of the green.

Yardage: 424 Handicap: 2

Yardage: 412 Handicap: 2

Yardage: 393 Handicap: 2

Yardage: 331 Handicap: 1

Hole Flyover
Hole 7 : Blind Hookey : Par 4
The tee shot should be kept simple and aimed for the middle of the fairway. Club selection from the tee needs to be taken into account as the fairway runs out at 273 yards from the white tee. An approach shot favouring the back-right portion of the green is preferred to avoid the danger short of the green.

Yardage: 411 Handicap: 6

Yardage: 366 Handicap: 6

Yardage: 349 Handicap: 6

Yardage: 295 Handicap: 5

Hole Flyover
Hole 8 : Crater : Par 3
A Par 3, which plays slightly uphill so an extra half club is advised. The green contours to the left and the right side of the green should be favoured.

Yardage: 166 Handicap: 12

Yardage: 156 Handicap: 12

Yardage: 147 Handicap: 12

Yardage: 128 Handicap: 13

Hole Flyover
Hole 9 : Burke’s Corner : Par 4
A tee shot to the left half of the fairway makes almost any pin position accessible for the approach shot. Aim for the right portion of the green to allow for the sever slope from right to left. Beware of the false front on this green, but equally be aware that it is 56 yards deep.

Yardage: 400 Handicap: 10

Yardage: 391 Handicap: 10

Yardage: 355 Handicap: 10

Yardage: 245 Handicap: 17

Hole Flyover
Hole 10 : Goats : Par 4
A tee shot with a right to left shape to follow the natural flow of the hole is advised. For the second shot an extra club is recommended to navigate the well protected front of the green.

Yardage: 441 Handicap: 3

Yardage: 424 Handicap: 3

Yardage: 403 Handicap: 3

Yardage: 362 Handicap: 2

Hole Flyover
Hole 11 : Liscannor : Par 4
Playing half a club downhill to a green which is well protected. There is no bail out on this shot so the best strategy is to say a prayer to the golfing Gods!

Yardage: 170 Handicap: 13

Yardage: 156 Handicap: 13

Yardage: 141 Handicap: 13

Yardage: 105 Handicap: 18

Hole Flyover
Hole 12 : Castle : Par 5
The line from the tee is 10 yards to the right of the Dough Castle in the distance. From the Red tee aim at Dough Castle in the distance. A good tee shot puts the green in range for the long hitter but threading the bunkers will be tough to set up an eagle opportunity. If playing as a three-shot hole, a lay up to the right side of the fairway will open the green for the approach shot. Don’t go left!

Yardage: 577 Handicap: 9

Yardage: 514 Handicap: 9

Yardage: 494 Handicap: 9

Yardage: 460 Handicap: 6

Hole Flyover
Hole 13 : Mine : Par 4
A faded tee shot aimed at the left half of the green will give the best chance of hitting this drivable Par 4. If you are unable to reach the green, a lay up to the left half of the fairway will leave the easier approach shot to a small green.

Yardage: 334 Handicap: 17

Yardage: 267 Handicap: 17

Yardage: 250 Handicap: 17

Yardage: 230 Handicap: 12

Hole Flyover
Hole 14 : Twins : Par 4/5
From the tee, a low draw off the bunker on the right will give you maximum distance and will set up a shorter shot to this long par four. If you can’t reach this green in two shots, it is advised to lay up short of the mounds guarding the approach.

Yardage: 461 Handicap: 5

Yardage: 451 Handicap: 5

Yardage: 429 Handicap: 5

Yardage: 429 Handicap: 10

Hole Flyover
Hole 15 : Brud’s Vision : Par 4/5
Index 1 and for good reason on this demanding Par 4! An ideal tee shot is just right of the well positioned bunker on the left side of the fairway. This will open up the safer left side of the green for the approach shot.

Yardage: 466 Handicap: 1

Yardage: 439 Handicap: 1

Yardage: 428 Handicap: 1

Yardage: 374 Handicap: 16

Hole Flyover
Hole 16 : Old Tom : Par 3
The safest shot on this tricky par three is towards the front left portion of the green. The green slopes from left to right and any miss hit towards the right side of the green can gather into the bunker.

Yardage: 195 Handicap: 11

Yardage: 192 Handicap: 11

Yardage: 175 Handicap: 11

Yardage: 128 Handicap: 14

Hole Flyover
Hole 17 : Pons Asinorum : Par 4
A tee shot favouring the left side of a split fairway, will leave a second shot were the centre of the green is the place to be.

Yardage: 467 Handicap: 7

Yardage: 408 Handicap: 7

Yardage: 398 Handicap: 7

Yardage: 318 Handicap: 8

Hole Flyover
Hole 18 : Shaw : Par 5/4
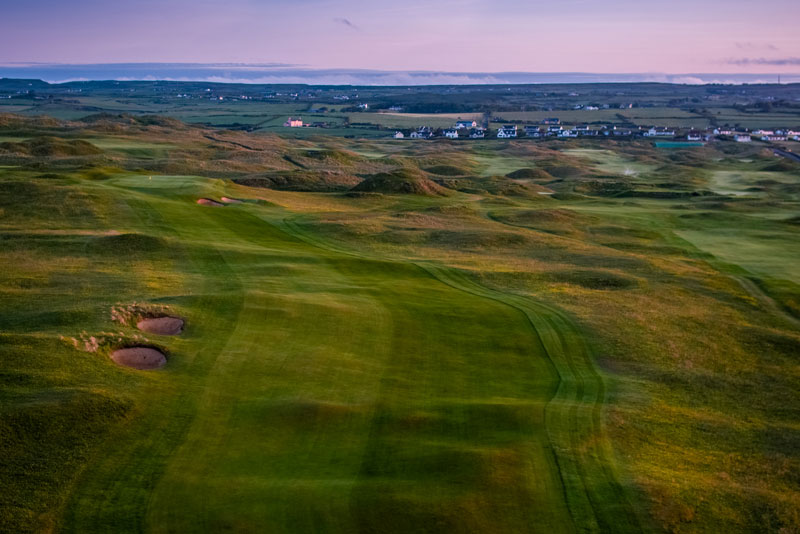
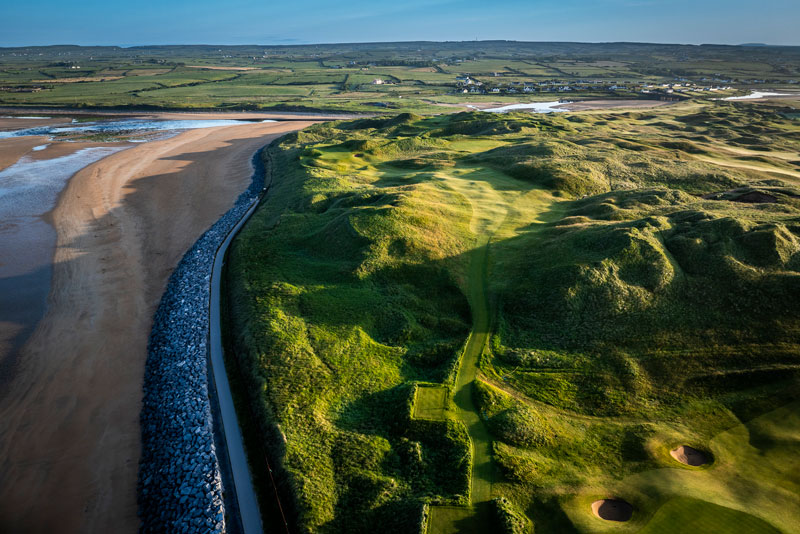
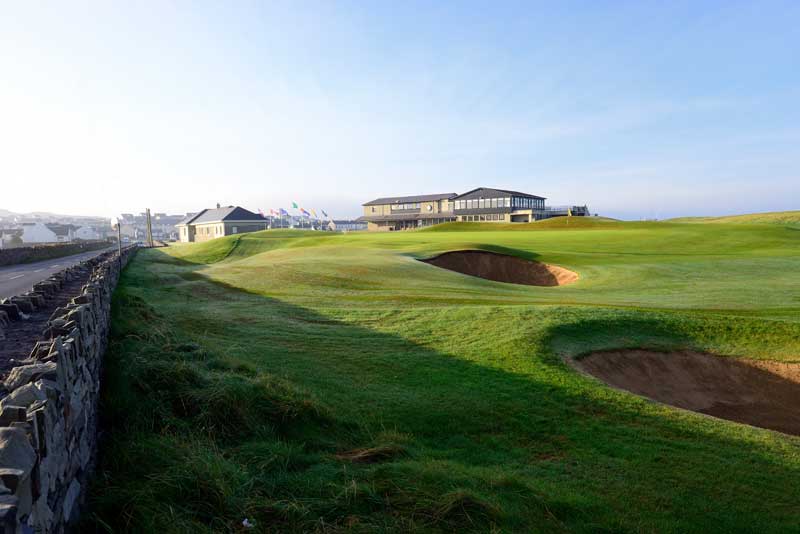
A straight drive is required, staying as close to the right edge of the fairway as possible. From the Red tee, the big hitter can aim for the left side of the clubhouse. Any tee shot left of centre can gather towards the bunkers on the left side. The second shot requires a decision to either, attack the green or to lay up short. If laying up, the left side of the fairway sets up the easiest approach shot to the green.

Yardage: 564 Handicap: 15

Yardage: 503 Handicap: 15

Yardage: 497 Handicap: 15

Yardage: 354 Handicap: 4

Hole Flyover

Back Nine

Scorecard & Rating

Course Par Length Course Rating Slope Rating
Blue 72 7066 74.8 133
White 72 6613 72.6 130
Green 72 6315 71.3 127
Red 74 5502 74.4 136

Caddies

Lahinch is a classic seaside links golf course and players are asked to enjoy their game by walking the course. The Club requires visitors playing the Old Course to take at least one caddie in the group. If caddies are not pre-booked, the Club will arrange for a minimum of one forecaddie to accompany each group.

Full of fun, wit and wisdom but forever dedicated to the job, the Lahinch caddies are professionally trained and well informed on the history and folklore of the Club. They continue to remain an essential element of the Lahinch ‘golfing experience’ and add greatly to the pleasure of a round on the Old course.

On one occasion as a golfer insisted on a wedge for his second shot at the par 4 6th hole, he asked his caddie ‘was he sure he’d reach the green, with that club‘? The gentle response came, ‘eventually.’

Read More >